Homemade Pie Crust for Pies and Tarts and how to pre-bake the crust
Homemade Pie Crust for Pies and Tarts and how to pre-bake the crust

Ingredients
-
1 1/4 cups (160g) all-purpose flour, plus extra for rolling
-
1/2 teaspoon salt
-
1/2 teaspoon sugar (increase to 1 1/2 teaspoons if for a sweet recipe)
-
8 tablespoons (1 stick, 112g) chilled unsalted butter, cut into 1/2 inch cubes
-
3 to 4 tablespoons ice water, very cold
Method
-
Combine flour, salt, sugar: Place the flour, salt, and sugar into a food processor and pulse until well combined.
-
Add the butter, half at a time: Add half of the butter cubes and pulse 8 times. Then add the other half of the butter cubes and pulse 6 more times.You should have a mixture that resembles a coarse meal, with many butter pieces the size of peas.
-
Slowly add ice water: Add two tablespoons of ice cold water (without the ice!) to the food processor bowl and pulse several times. Then add more ice water, slowly, a teaspoon at a time, pulsing several times after each addition, until the mixture just barely begins to clump together. If you pinch some of the crumbly dough and it holds together, it’s ready, if not, add a little more water and pulse again. Try to keep the water to a minimum. Too much water will make your crust tough.
-
(Optional) Press dough a few times to flatten some of the butter for a more flaky crust: Remove the crumbly mixture from the food processor and place on a very clean, smooth surface. If you want an extra flaky crust, you can press the heel of your palm into the crumbly mixture, pressing down and shmooshing the mixture into the table top. This is a French technique, called “fraisage”. Do this a few times, maybe 4 to 6 times, and it will help your crust be extra flaky.
-
Form dough into a disk, wrap and chill: Then, use your hands to press the crumbly dough together and shape into a disk. Work the dough only enough to just bring the dough together. Do not over-knead or your crust will end up tough. You should be able to see little bits of butter, speckling the dough. When these bits of butter melt as the crust cooks, the butter will help separate the dough into flaky layers. So, visible pieces of butter are a good thing, what you are aiming for, in the dough. Sprinkle the disc with a little flour on all sides. Wrap the disc in plastic wrap and refrigerate at least 1 hour. (At this point you can freeze the dough disk for a month until ready to use. Defrost overnight in the refrigerator before proceeding.)
-
Remove from refrigerator and let sit for a few minutes: When you are ready to roll out the dough, remove the disk from the refrigerator and let it sit for 10 to 15 minutes to take enough of a chill off of it so that it becomes easier to roll out. While the dough disk is still wrapped in plastic, warm the edges with your hands. If there are any cracks in the dough, massage them to close them.
-
Roll out the dough: Place the dough disk on a lightly floured, clean flat surface. Sprinkle some flour on top of the disk. If the dough is a bit stiff, use your rolling pin to press down on the center a few times. No need to be gentle at this point. You’re trying to shock the chilled butter in the dough to loosen up a bit. Roll out the dough to a 12 inch circle, to a thickness of about 1/8 of an inch thick. As you roll out the dough, check if the dough is sticking to the surface below. Add a few sprinkles of flour if necessary to keep the dough from sticking.
-
Line a pie or tart pan: Place on to a 9-inch pie plate or tart pan, lining up the fold with the center of the pan. Gently unfold and press down to line the pie dish with the dough. Freeze until ready to cook. To cook the pie crust, follow the directions for the pie you are making.
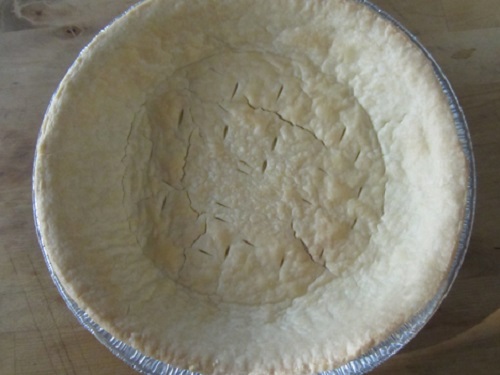
If you would like to pre-bake the crust,
Method
-
Pre-heat your oven to 350°F:
Make sure you are starting with a frozen pie crust, not defrosted. Your pie crust should been in the freezer for at least 30 minutes, preferably an hour. Freeze the un-cooked pie crust for at least 30 minutes, preferably an hour, before blind-baking. If the crust is frozen when it goes into the hot oven, the outside edges will have more of a chance to set before the fat melts.
-
Line the inside of the frozen pie crust with foil:
Use heavy duty aluminum foil, pressing the foil against the sides and bottom of the crust, allowing the foil to extend by a couple of inches on two opposing sides. Stick-free heavy duty foil works well for this, to help keep the crust from sticking to the foil when you remove it. You may need two sheets of foil to get full coverage.
-
Fill the pie crust with pie weights:
Fill the pie crust to the top with pie weights. You can use ceramic weights, dry beans, rice, or white sugar. Sugar works well because of its small granule size; it distributes the weight more evenly against the crust. (Baking the sugar this way also lightly caramelizes it, making it even more flavorful if you want to use it later for baking recipes.)
-
Bake:
Bake at 350°F for 45-50 minutes if making a crust for a pie that you will cook further, like a quiche. Bake for 60 to 75 minutes if making a crust for a pie that will need no further baking.
-
Remove from oven:
Remove the pie shell from the oven. Using the excess foil on 2 sides of the pie shell, lift out the pie weights from the pie shell. Let the pie weights cool. Store them for future use.
Note: When baking a pie with your pre-baked pie crust, I recommend protecting the rim from getting over-baked with aluminum foil or a pie rim protector.


